2020-05-07

Running Query in SQLCMD mode in SSMS

Today I would like to talk about another easily overlooked but very useful feature in SQL Server Management Studio, which is running query in SQLCMD mode. This mode allows you to embed SQLCMD comands into your T-SQL script and execute it by using the SSMS. The most powerful use of this feature is you can run one script in multiple server instances, by using the :CONNECT SQLCMD command to connect to different instances. For example, you need to check the synchronization state of all databases in all production server instances, rather than connecting the server instances one by one in SSMS and checking them by Availability Group Dashboard, you will be more comfortable to just execute one script file once like below:
:CONNECT (local)\TARGETSVR1
SELECT R.replica_server_name, D.synchronization_state_desc, B.[name] AS DatabaseName FROM sys.dm_hadr_availability_replica_cluster_states R JOIN sys.dm_hadr_database_replica_states D ON R.replica_id = D.replica_id JOIN sys.databases B ON D.database_id = B.database_id WHERE replica_server_name = @@SERVERNAME;
GO
:CONNECT (local)\TARGETSVR2
SELECT R.replica_server_name, D.synchronization_state_desc, B.[name] AS DatabaseName FROM sys.dm_hadr_availability_replica_cluster_states R JOIN sys.dm_hadr_database_replica_states D ON R.replica_id = D.replica_id JOIN sys.databases B ON D.database_id = B.database_id WHERE replica_server_name = @@SERVERNAME;
GO

Before running the above script, you should enable SQLCMD mode for the opening query editor:
Remind that you must type the GO command before each :CONNECT command, in order to seperate each batch to be executed on different server instances, otherwise all batches will be executed on the lowest server instance in your script, which will be a mistake, e.g.


2020-04-08

Policy Based Management

This monthly blog post I like to introduce another overlooked SQL Server build-in feature, Policy Based Management (PBM), which is very useful indeed especially if you are a server/infrastructure DBA of a big corporation who need to administer many SQL Server instances. This feature can help us to evaluate and enforce some policies on database servers, such as naming conventions, file locations, and many configuration settings on different objects including server, database, file, login, table, etc. You can just create one set of policies, and apply the same set of policies to multiple server instances. Here I will demonstrate how to create policies to check whether the data files and log files of user databases are placed in the intended disk drives, another policy to enforce database enabling RCSI.

1. In SSMS Object Explorer, expand Management > Policy Management > right-click Conditions > New Condition. Create four conditions:
Name: Not System Databases. Facet: Database. Expression: @IsSystemObject = False
Name: Data File in M drive. Facet: Data File. Expression: @FileName LIKE 'M:%'
Name: Log File in N drive. Facet: Log File. Expression: @FileName LIKE 'N:%'
Name: Database RCSI enable. Facet: Database. Expression: @IsReadCommittedSnapshotOn = True


2. Right-click Policies > New Policy. Create three policies:
Name: Data Files Location. Check condition: Data File in M drive. Against targets: Every File, in Every FileGroup, in Not System Databases Database.
Name: Log Files Location. Check condition: Log File in N drive. Against targets: Every LogFile, in Not System Databases Database.
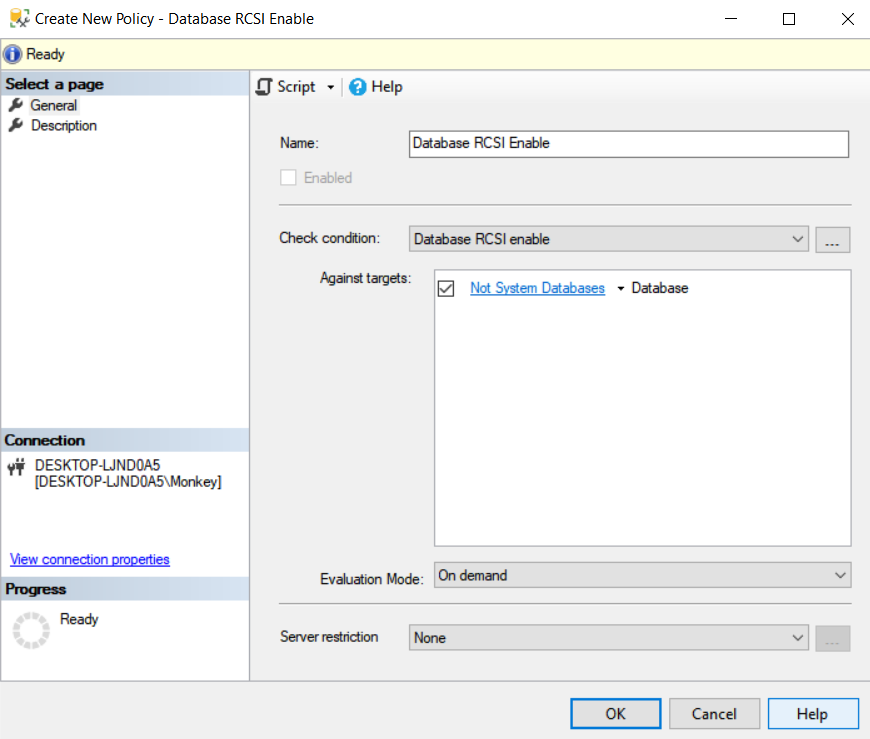
Name: Database RCSI enable. Check condition: Database RCSI enable. Against targets: Not System Databases Database.
As you can see, PBM condition can be used as Checking condition, and also be used as Filtering condition on target.


3. Now you are done on creating policies, let's evaluate them on local server instance. Right-click the Policies folder in object explorer > Evaluate > tick your tailor-made policies > press Evaluate button.

4. In the result, you can see which targets are violating your policies, and viewing the details.

5. For the Database RCSI enable policy, you can also apply the policy on the target, which essentially set the database RCSI option on, i.e. it runs ALTER DATABASE [UserDB] SET READ_COMMITTED_SNAPSHOT ON for you.

6. You can also create all policies in a central server instance, and evaluate the centralized policies on another server instances. In the Evaluate Policies window, you can select the Source, where you can select the central server.

BPM is easy to use. You even don't need to type one line of coding in order to create your own set of custom conditions and policies.

2020-03-06

SQL Agent Multi-Server Administration

Let's say you are a SQL Server database administrator working for a big corporation, which has hundreds of server instances. You have a bunch of agent jobs like the Ola's maintenance solution that you want to deploy on all the server instances in your company, and you like to manage those jobs across all the instances in a centralized master. Most database administrators believe it can only be done by 3rd party management tools. In fact, SQL Server Agent service has a built-in feature named Multi-server Administration (a.k.a. MSX/TSX) which was overlooked by most of you. In this blog post I would like to demonstrate how to use this feature to deploy and manage agent job in multiple target servers. For the sake of simplicity, I setup 3 server instances in my local PC: the default instance which will be the master server (MSX), while the other 2 instances named TargetSvr1 and TargetSvr2 will be the target servers (TSX). Let's start to see how to do it.

In the MSX, right-click SQL Server Agent >  Multi Server Administration > Make this a Master.

Click Next in the welcome page, specify an operator email if you like, or just click Next to skip it.

Add the target servers, then click Next to continue.

It will check the server compatibility, click Close once all targets passed the checking.

Let this wizard to create the login in your master server if necessary. Next.

Review the configuration. Click Finish.

Oops! There's an error.


In order to overcome it, for simplicity let's modify the registry key as stated in the online document, for each of your target servers, set them to zero.

Do the above steps again. You should success.

Now we can try to create a multi-server job. In order to proof the job really being executed in all the target servers, let's create a simple table in a testing database on all the target servers first.
USE master
GO
CREATE DATABASE TestingDB
GO
USE TestingDB
GO
CREATE TABLE TestTable (col varchar(50));
GO


Refresh the SSMS Object Explorer, SQL Server Agent in master server becomes MSX, and those in target servers become TSX.

And there's a new folder, Multi-Server Jobs, inside the master server. Let's create a job there which insert a row into the testing table. Here's the job body:
DECLARE @s varchar(50) = CAST(GETDATE() AS varchar(50));
INSERT TestingDB..TestTable VALUES (@s);


In the target tab of the new job window, specify the target servers of this job.

The default polling interval of multi-server job is one minute, which means jobs will be deployed and executed in the target servers one minute after the deployment and job firing in master.

After one minute, refresh the object explorer, you will see the job is deployed in all targets.

Let's execute the job in the Master server.

After one minute, run a multi-server query in your targets, you should see the new row exists in all target servers.

You can also check the job history in the master server.

Please be reminded that MSX/TSX doesn't guarantee the job executions are at the same time among the targets.

2020-02-15

How to make a Table Non-Updatable

It's a common business requirement that some data needed to be unchangeable once it entered into the database, such as payments, bank transfers, bets, etc. Unfortunately, SQL Server has no built in declarative support for immutable columns, but we database administrators and sql developers can make it ourselves by writing triggers which rollback or skip the update operations. In order to tighten it up, we can obscure the body text of the trigger using WITH ENCRYPTION option in the create trigger statement. Furthermore, we can create SQL Server Audit on SCHEMA_OBJECT_CHANGE_GROUP event class, in order to trace any alter/drop/disable operations on the triggers. Let's see a simple demo:

USE TestDB
GO
-- Create a demo Table, with one primary key column, one ordinary column, and one immutable column
CREATE TABLE DemoTable (pk int PRIMARY KEY, col1 varchar(50), immutableCol varchar(50));
GO

-- Create an encrypted trigger to prevent update on the immutable column
CREATE TRIGGER tr_DemoTable_Upd ON DemoTable
WITH ENCRYPTION
AFTER UPDATE
AS
BEGIN
SET NOCOUNT ON;
IF UPDATE(immutableCol) BEGIN ROLLBACK; RETURN; END
END
GO

-- Create a server audit object
USE master
GO
CREATE SERVER AUDIT Audit_Demo
TO FILE (
FILEPATH = N'D:\temp',
MAXSIZE = 50 MB,
MAX_ROLLOVER_FILES = 1000
)
WITH (ON_FAILURE = CONTINUE);
GO
ALTER SERVER AUDIT Audit_Demo WITH (STATE = ON);
GO
-- Create database audit specification to trace schema changes in the user database
USE TestDB
GO
CREATE DATABASE AUDIT SPECIFICATION DbAuditSpec_SchemaChg
FOR SERVER AUDIT Audit_Demo
ADD (SCHEMA_OBJECT_CHANGE_GROUP)
WITH (STATE = ON);
GO


Now we have done all the widgets, let's have a test on it.
-- add a testing row
INSERT DemoTable (pk, col1, immutableCol) VALUES (1, 'ABC', 'Immutable value');
GO
SELECT * FROM DemoTable;
GO
-- try updating the immutable column, which should be fail
UPDATE DemoTable SET immutableCol = 'Update it';
GO
SELECT * FROM DemoTable;


Let's try to disable the trigger, then check the audit log to see this action has been logged.
DISABLE TRIGGER tr_DemoTable_Upd ON DemoTable;

Although this approach cannot stop someone with sysadmin right to modify the data, it can deter them from attacking it.

2020-01-15

Change Data Capture (CDC) for tracking data change

SQL Server provides two features that track changes to table data: Change Data Capture (CDC) and Change Tracking (CT). While CT is a synchronous mechanism and less overhead, it only captures the event that rows in a table were changed, but does not capture the actual data. On the other hand, CDC relies on SQL Server Agent jobs to asynchronously capture changes for a table, both the fact that changes were made and the actual data. Before SQL Server 2016, CDC was an enterprise edition only feature. Starting from SQL Server 2016, CDC is also available in standard edition. Below picture is obtained from online SQL Docs illustrating the architecture of CDC.
Source tables are the user tables in your database that enabled CDC. When DML statements applied on user tables, the database modifications made are recorded on transaction log. A capture agent job is created when the first table in the database is enabled for CDC, this capture job periodically scans the transaction log and adds information about changes into change tables. SQL developers are provided with built-in functions to enumerate the captured changes.

Let's see a demo on how to use CDC.

1. Enable CDC for the current database.
USE TestDB;
GO

EXEC sys.sp_cdc_enable_db; 

2. Create a new table with primary key.
CREATE TABLE TestTable (ID int, col varchar(50), col2 varchar(50), CONSTRAINT PK_TestTable PRIMARY KEY (ID));

3. Enable CDC for the user table.
EXEC sys.sp_cdc_enable_table @source_schema = 'dbo', @source_name = 'TestTable', @role_name = NULL;
Two Agent jobs are created with each CDC enabled database: one that is used to capture changes, another is responsible for change table cleanup.
The capture job is started immediately and runs continuously. By default, it captures a maximum of 1000 transactions per cycle with a wait of 5 seconds between cycles. The cleanup job runs once daily at 2AM, and retains change table entries for 4320 minutes. You can check these configurations by executing sys.sp_cdc_help_jobs stored procedure.


4. List the tables which enabled CDC, get the capture_instance name.
EXEC sys.sp_cdc_help_change_data_capture;
By default, the capture instance name is derived from the source schema name plus the source table name in the format schemaname_sourcename, in our example, it's dbo_TestTable.

5. Apply some DML on the table, then uses the fn_cdc_get_all_changes function to get the changes.
DECLARE @begin binary(10), @end binary(10);
SET @begin = sys.fn_cdc_get_min_lsn('dbo_TestTable');
SET @end = sys.fn_cdc_get_max_lsn();
SELECT CASE __$operation WHEN 1 THEN 'delete' WHEN 2 THEN 'insert' WHEN 3 THEN 'PreUpdate' WHEN 4 THEN 'PostUpdate' ELSE 'Unknown' END AS Operation, *
    FROM cdc.fn_cdc_get_all_changes_dbo_TestTable(@begin, @end, N'all update old') ORDER BY __$start_lsn, __$seqval;
GO

As you can see, rolled back DML won't be captured
After inserted one row, the enumerate function returns one row stating an insert for a new row:
When multiple rows were inserted within one transaction, those inserts have the same __$start_lsn:
You can also use fn_cdc_get_net_changes function to get the changes, which only returns one net change row for each source row changed within the specified LSN range.


SQL Server provides quite a few functions and stored procedures that you can use to enumerate and manipulate CDC change tables according to your application requirement. Please refer to the online SQL Docs for all of them.

2019-12-19

Transform JSON data into rowset

JSON is a popular data format used for storing unstructured data. Many RESTful web services return results and accept inputs in JSON format. Starting from SQL Server 2016, it has native support on parsing JSON data. This blog post demonstrates how to transform JSON data into a rows and columns, and joining the result with table data.

Firstly, let us create a table named Products, which stores the product details into a text column with JSON format:

CREATE TABLE Products (
    id int NOT NULL PRIMARY KEY,
    [name] varchar(50) NOT NULL,
    detailsInJson nvarchar(4000) NOT NULL
);


Then populate some sample rows into it:

INSERT Products (id, [name], detailsInJson) VALUES (1, 'Toy Car',     '{"size" : "10cm x 20cm x 30cm", "color" : "red", "type" : "mini"}');
INSERT Products (id, [name], detailsInJson) VALUES (2, 'Teddy Bear', '{"color" : "brown", "texture" : "cloth"}');


Let's double check the table data:

As you can see, each row has its own set of attributes in the JSON data.
We can retrieve the JSON data using OPENJSON function as below:

SELECT id, [name], D.*
FROM Products
CROSS APPLY OPENJSON (detailsInJson) WITH (
    color varchar(50) '$.color',
    size varchar(50) '$.size',
    [type] varchar(50) '$.type',
    [texture] varchar(50) '$.texture'
) AS D;


Below is the query result:

You can also check the execution plan of this query, OPENJSON is essentially a Table Valued Function which do the transformation:

SQL Server 2016 introduces various new built-in functions to process JSON data, which can be found in Microsoft SQL Docs.

2019-11-19

Striped Database Backup

SQL Server allows you to backup your database or transaction log in a striped media set. A striped set is a set of disk files on which backup data is divided into blocks and distributed in a fixed order. Most database administrators overlook this feature. It can be used to speed up the backup process by distributing the backup workload into multiple storage devices.

Below scripts demonstrate how to make a striped backup set:
BACKUP DATABASE [StackOverflow2013]
TO
DISK='D:\DbBackup\StackOverflow2013_1.bak',
DISK='D:\DbBackup\StackOverflow2013_2.bak',
DISK='D:\DbBackup\StackOverflow2013_3.bak',
DISK='D:\DbBackup\StackOverflow2013_4.bak'
WITH STATS = 10
GO

I only used the same drive D:\ on above script, but you can specify different drives for each DISK.
Here is the result:

Below script demonstrate how to restore from a striped backup:
RESTORE DATABASE [StackOverflow2013]
FROM
DISK='D:\DbBackup\StackOverflow2013_1.bak',
DISK='D:\DbBackup\StackOverflow2013_2.bak',
DISK='D:\DbBackup\StackOverflow2013_3.bak',
DISK='D:\DbBackup\StackOverflow2013_4.bak'
WITH STATS = 10

GO


The major downside of striped backup is that if one backup file is corrupted, you cannot restore it.