You have the sysadmin privilege in the SQL Server instance, for some reason you need to check the service accounts executing the database engine, agent, and other services. All we know you can get the answer from SQL Server Configuration Manager, but you need to login the Windows OS in the database server first, which is little bit inconvenient. Even more it's the system engineer team in charge of maintaining Windows server, not you, and they don't let you login the OS. Since SQL Server 2008R2 SP1 we have a documented DMV sys.dm_server_services gives us information about the SQL Server, Full-Text, SQL Server Launchpad service, and SQL Server Agent services in the current instance of SQL Server.
As you can see in the result, this DMV also returns the startup type, running status, and other useful information about the services.2020-09-02
2020-08-08
SQL Server Always Encrypted Part 2
In part one, I demonstrated how to create a table with always encrypted columns. Now let's create a stored procedure to insert a row into it, another stored procedure to query a row from it, and a C# .NET console application to call these stored procedures. You will see that even if you get the sysadmin privilege, you cannot simply run query statement or call stored procedures to access those encrypted data.
Let's create the column master key and column encryption key using SSMS GUI:
In the user database, expand Security > Always Encrypted Keys > right-click Column Master Key > New > type the Name > click Generate Certificate.
Then right-click Column Encryption Key > New > type the Name > select the master key.
Let's create the table:
CREATE TABLE TestEncryptTable (
id int IDENTITY(1, 1) PRIMARY KEY,
encryptedLookupCol varchar(11) COLLATE Latin1_General_BIN2 ENCRYPTED WITH (
ENCRYPTION_TYPE = DETERMINISTIC,
ALGORITHM = 'AEAD_AES_256_CBC_HMAC_SHA_256',
COLUMN_ENCRYPTION_KEY = TestColumnEncryptKey) NOT NULL,
encryptedValueOnlyCol varchar(11) COLLATE Latin1_General_BIN2 ENCRYPTED WITH (
ENCRYPTION_TYPE = RANDOMIZED,
ALGORITHM = 'AEAD_AES_256_CBC_HMAC_SHA_256',
COLUMN_ENCRYPTION_KEY = TestColumnEncryptKey) NOT NULL
);
Here are the stored procedures that my application will call to add and get row from the always encrypted table:
USE TestDB
GO
CREATE OR ALTER PROC InsertEncryptRow (
@encryptedLookupCol varchar(11),
@encryptedValueOnlyCol varchar(11)
) AS
BEGIN
INSERT TestEncryptTable VALUES (
@encryptedLookupCol, @encryptedValueOnlyCol);
END
GO
CREATE OR ALTER PROC GetEncryptRow (
@id int
) AS
BEGIN
SELECT * FROM TestEncryptedTable WHERE id = @id;
END
In the C# application, the database connection string must specify a new option for enabling Always Encrypted. This is the 'Column Encryption Setting = Enabled''option.
using System;
using System.Data;
using System.Data.SqlClient;
namespace TestAlwaysEncrypted
{
public class Class1
{
public static string CS = "Data Source=.;Initial Catalog=TestDB;Column Encryption Setting=Enabled;Integrated Security=True";
static void Main(string[] args)
{
string a1 = args[0];
string a2 = args[1];
SqlConnection conn = new SqlConnection(CS);
using (conn)
{
conn.Open();
string cmd = "InsertEncryptRow";
SqlCommand sqlCmd = new SqlCommand(cmd, conn);
sqlCmd.CommandType = CommandType.StoredProcedure;
sqlCmd.Parameters.Add("@encryptedLookupCol", SqlDbType.VarChar);
sqlCmd.Parameters["@encryptedLookupCol"].Value = a1;
sqlCmd.Parameters.Add("@encryptedValueOnlyCol", SqlDbType.VarChar);
sqlCmd.Parameters["@encryptedValueOnlyCol"].Value = a2;
sqlCmd.ExecuteNonQuery();
}
}
}
}
Execute the .NET project a few times, you can see the table has some new rows filled in, but you cannot see the encrypted data even you are the sysadmin of your SQL Server:
In order to see the data in SSMS, you can specify the Column Encryption setting when connected to the SQL instance through the 'Additional Connection Parameters' option:
Run the select query again, you can see the data now.You can also verify that the data transmitted from the client application to your SQL Server is really encrypted, by using SQL Profiler to trace the stored procedure executed:The .NET library automatically calls a SQL Server built-in stored procedure, sp_describe_parameter_encryption, so it knows which parameters needed to be encrypted. 2020-07-10
SQL Server 2019 great new feature - Accelerated Database Recovery (ADR)
Firstly let's measure the update and rollback time for the following update 236667 rows involved:
USE WideWorldImporters;
SELECT COUNT(*) FROM Warehouse.StockItemTransactions;
BEGIN TRAN
DECLARE @updateStartTime datetime = GETDATE();
UPDATE Warehouse.StockItemTransactions SET SupplierID = 1;
DECLARE @updateEndTime datetime = GETDATE();
ROLLBACK
DECLARE @rollbackEndTime datetime = GETDATE();
SELECT DATEDIFF(millisecond, @updateStartTime, @updateEndTime) updateTime, DATEDIFF(millisecond, @updateEndTime, @rollbackEndTime) rollbackTime;
Without ADR, it takes more than 12 seconds to rollback the update statement.
Enable ADR on the WideWorldImporters database by executing below alter database statement:
USE master
GO
ALTER DATABASE WideWorldImporters SET ACCELERATED_DATABASE_RECOVERY = ON;
You can verify ADR really enabled by checking the server error log:
Run the update statement again, you will see the rollback is instantaneous!
Now we SQL Server database administrators have a great reason to convince our boss to pay for a software upgrade :D
2020-06-01
Cannot shrink log file because the logical log file located at the end of the file is in use
Cannot shrink log file because the logical log file located at the end of the file is in use.
This error is so common, especially if your database has publications of transactional replication and the log reader agent is not fast enough to process, but that's not the case this time. If it's a standalone or FCI sql server instance, as a quick fix, I will set the database to SIMPLE recovery model, shrink the log file, then set it back to FULL recovery, do a full backup and a log backup. But this database is in an availability group, we must remove the database from its availability group before setting it to SIMPLE recovery. So I further troubleshoot this case as below.
1. What is log reuse waiting on? We can check it by running a query on sys.databases DMV, which the log_reuse_wait columns tell you the reason.
USE [UserDB]
GO
DBCC LOGINFO; -- status 2 means the VLF is still in use
GO
SELECT [name], log_reuse_wait, log_reuse_wait_desc FROM sys.databases;
GO
2. I found the wait value was 13 (OLDEST_PAGE), which is caused by Indirect Checkpoint (default for newly created databases in SQL Server 2016), so I turn it off. Then the shrink log succeed.
USE master
GO
ALTER DATABASE [UserDB] SET TARGET_RECOVERY_TIME = 0 SECONDS WITH NO_WAIT;
GO
USE [UserDB]
GO
DBCC SHRINKFILE (N'UserDB_log' , 1024);
GO
Learning never stop for a SQL Server database administrator :)
2020-05-07
Running Query in SQLCMD mode in SSMS
SELECT R.replica_server_name, D.synchronization_state_desc, B.[name] AS DatabaseName FROM sys.dm_hadr_availability_replica_cluster_states R JOIN sys.dm_hadr_database_replica_states D ON R.replica_id = D.replica_id JOIN sys.databases B ON D.database_id = B.database_id WHERE replica_server_name = @@SERVERNAME;
GO
:CONNECT (local)\TARGETSVR2
SELECT R.replica_server_name, D.synchronization_state_desc, B.[name] AS DatabaseName FROM sys.dm_hadr_availability_replica_cluster_states R JOIN sys.dm_hadr_database_replica_states D ON R.replica_id = D.replica_id JOIN sys.databases B ON D.database_id = B.database_id WHERE replica_server_name = @@SERVERNAME;
GO
Remind that you must type the GO command before each :CONNECT command, in order to seperate each batch to be executed on different server instances, otherwise all batches will be executed on the lowest server instance in your script, which will be a mistake, e.g.
2020-04-08
Policy Based Management
1. In SSMS Object Explorer, expand Management > Policy Management > right-click Conditions > New Condition. Create four conditions:
Name: Not System Databases. Facet: Database. Expression: @IsSystemObject = False
Name: Data File in M drive. Facet: Data File. Expression: @FileName LIKE 'M:%'
Name: Log File in N drive. Facet: Log File. Expression: @FileName LIKE 'N:%'
Name: Database RCSI enable. Facet: Database. Expression: @IsReadCommittedSnapshotOn = True
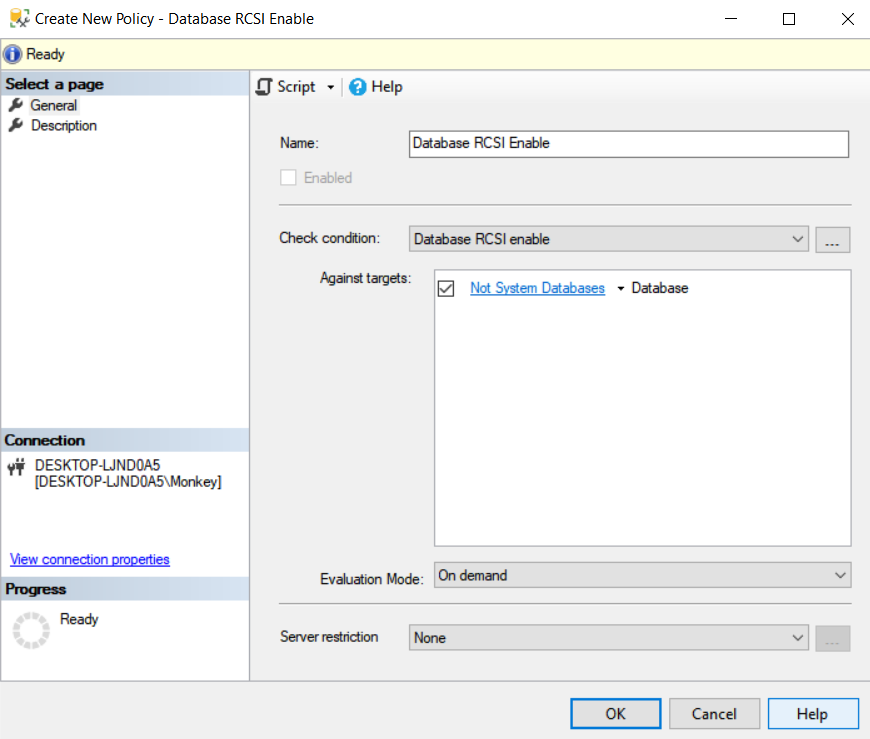
2. Right-click Policies > New Policy. Create three policies:
Name: Data Files Location. Check condition: Data File in M drive. Against targets: Every File, in Every FileGroup, in Not System Databases Database.
Name: Log Files Location. Check condition: Log File in N drive. Against targets: Every LogFile, in Not System Databases Database.
Name: Database RCSI enable. Check condition: Database RCSI enable. Against targets: Not System Databases Database.
As you can see, PBM condition can be used as Checking condition, and also be used as Filtering condition on target.
3. Now you are done on creating policies, let's evaluate them on local server instance. Right-click the Policies folder in object explorer > Evaluate > tick your tailor-made policies > press Evaluate button.
4. In the result, you can see which targets are violating your policies, and viewing the details.
5. For the Database RCSI enable policy, you can also apply the policy on the target, which essentially set the database RCSI option on, i.e. it runs ALTER DATABASE [UserDB] SET READ_COMMITTED_SNAPSHOT ON for you.
6. You can also create all policies in a central server instance, and evaluate the centralized policies on another server instances. In the Evaluate Policies window, you can select the Source, where you can select the central server.
BPM is easy to use. You even don't need to type one line of coding in order to create your own set of custom conditions and policies.
2020-03-06
SQL Agent Multi-Server Administration
In the MSX, right-click SQL Server Agent > Multi Server Administration > Make this a Master.
Click Next in the welcome page, specify an operator email if you like, or just click Next to skip it.
Add the target servers, then click Next to continue.
It will check the server compatibility, click Close once all targets passed the checking.
Let this wizard to create the login in your master server if necessary. Next.
Review the configuration. Click Finish.
Oops! There's an error.
In order to overcome it, for simplicity let's modify the registry key as stated in the online document, for each of your target servers, set them to zero.
Do the above steps again. You should success.
Now we can try to create a multi-server job. In order to proof the job really being executed in all the target servers, let's create a simple table in a testing database on all the target servers first.
USE master
GO
CREATE DATABASE TestingDB
GO
USE TestingDB
GO
CREATE TABLE TestTable (col varchar(50));
GO
Refresh the SSMS Object Explorer, SQL Server Agent in master server becomes MSX, and those in target servers become TSX.
And there's a new folder, Multi-Server Jobs, inside the master server. Let's create a job there which insert a row into the testing table. Here's the job body:
DECLARE @s varchar(50) = CAST(GETDATE() AS varchar(50));
INSERT TestingDB..TestTable VALUES (@s);
In the target tab of the new job window, specify the target servers of this job.
The default polling interval of multi-server job is one minute, which means jobs will be deployed and executed in the target servers one minute after the deployment and job firing in master.
After one minute, refresh the object explorer, you will see the job is deployed in all targets.
Let's execute the job in the Master server.
After one minute, run a multi-server query in your targets, you should see the new row exists in all target servers.
You can also check the job history in the master server.
Please be reminded that MSX/TSX doesn't guarantee the job executions are at the same time among the targets.